(If you don’t want to read all my mad ramblings, then go directly to the part “Our tool” =)
During our previous Windows Xp to Windows 7 migration (2013-2014) we upgraded approximately 13000 computers, then as now we were using Broadcom (formerly Symantec) CMS(Altiris) for deployment, and ended up repackaging over 400 different virtual packages with Symantec SEV (Symantec Endpoint Virtualization).
That format was great for compatibility, and for the most parts it worked pretty well once you knew it's bugs and quirks, but we had to throw it away after Symantec made us aware in early 2017 they would EOL it from the summer of 2018.
After a lot of research and testing, we decided that our Windows 7 to Windows 10 migration would be all about APP-V. That way we could also reuse most of our new App-V packages on our current Citrix environment, and in future VDI solutions.
We were concluding it is the only virtualization tool big enough not going EOL on short notice like SEV. Repackaging, testing and upgrading all your major applications into a new package format is for sure one of the most time-consuming workloads in larger IT organizations, so we didn't want to do that again anytime soon.
Coming from another advanced virtualization technology, the first thing I noticed was all that things it was different and missing compared to SEV, mostly in terms of functionality, compatibility and flexibility. SEV was behaving much more like a normal MSI install on computers, so we could capture all services, printer drivers and we could even patch up applications like Ms Office directly into the writable virtual layer using Windows update.
A lot of the things I think APP-V is missing compared to SEV is obvious a result of the overly strict isolation design and the restrictions it has that's blocking updates of executable file types through copy on write (COW), so I wanted to get some of that back from fully understanding the technology, and try to fix it during the process from Sequencing too deployment through scripting and/or workarounds.
Another issue for us was the very time-consuming and less than user-friendly implementation when adding many scripts on each Add/Publish/Remove /Unpublish event through Scriptrunner.
So I booked myself and a colleague an advanced APP-V training class in the Netherlands early 2017 with the godfather of APP-V, Timothy Mangan.
I learned a lot but I also ended up with a lot of new questions I needed answers to after that training class.
First off all I wanted to integrate the installation of App-V packages better with Altiris, I tried reaching out through our Symantec contacts and even through forums, but nothing solid came back so I had to find my own answers.
What 3rd party tools are out there?
Looking at all the App-V tools I could find out there I built a list of pros and cons.
(Note, Tmedit was not available at first when we made our first tests and automations for detection rule scripts)
Ms Sequencer is not my first or even second choice as main APP-V editor, I think it's outdated and slow for that purpose. It's not giving me much more than being really good for capturing packages, after the first sequencing part you should close it up, and go on working using other tools.
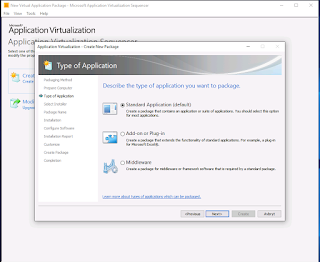
Ms Sequencer screenshot
That’s where AVE, Tmedit and Tweakappv comes in handy. They do all give you some extra functionality and possibilities the other programs lack.
Also, you can buy bigger and more expensive solutions like Flexera Admin Studio, RayPack Studio and Advanced Installer, but they are overly expensive and complex for repacking installs into APP-V format IMO.
AVE is not free but well worth the price tag since it will save you a lot of time on small edits, it has by far the nicest GUI and overview, and is the fastest overall editor. It’s really good for editing small stuff like shortcuts, extracting and importing files and folders, plus registry values and turning functions on and off.
But I really can't get used to the script part, and the automation part is not to good IMO, then you have to buy the not free Lib-V, but which is a fantastic product if you want to build your own tools, and Auto Sequencer fixups.
My favourite tool for quick edits and looking into packages.
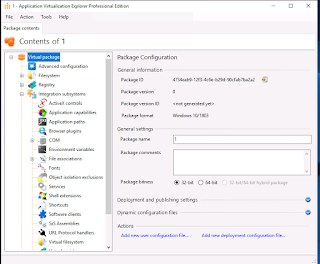
AVE screenshot
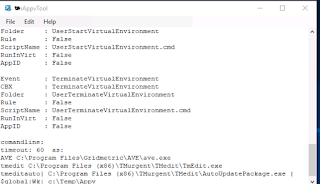
Tmedit is also not free, but it has an amazing “Analysis & Fixes” toolkit, and it will help clean-up junk files and optimize stuff most of us don’t even know about. It will also give you a lot of good tooltip information about every App-V function, and the automation framework is really good. And Timothy Mangan update this tool very often, sometimes he even solves Sequencer bugs before Ms does.
My favourite tool for clean-ups and fixups.
But not my favourite file and registry editor, but it will do its stuff, also not very fast when opening and saving large App-V files compared to AVE.

Tmedit screenshot
Tweakappv Using this small and free command line tool from Advanced Installer we have finally found a working command line interface for modifying files and properties inside our App-V packages without using manual editing and without triggering the internal App-V CRC check.
This way we can automate the creation of scripts, we use it for Altiris detection rules with App-V packages, but Broadcom (formerly Symantec) has later updated CMS to support and can now detect App-V and App-X packages.
If you search the rest of my blog and google you will see a lot of examples of free tools and examples we have created with it, and things it can do for you.
The CLI interface can do most things directly, but some more advanced edits must be done through Xslt transforms, but if you do master this you have a winner :)
My favourite tool for automation.
Use case: We have used it in scripts that treat reading and extracting internal manifest files from App-V files with 7zip command line version).
When we have the AppxManifest file on our computer we create a script/program that read from the xml file.
Find things like "Identity Name",'Version="', 'appv:PackageId="' and 'appv:VersionId="'.
Using string split or an xml parser to get the values and store as variables in your script.
Then update them in our own tool and send them back through Tweakappv.

Tweakappv screenshot
Choosing delivery system:
Based on our own experience I wanted to have the possibility of a streaming solution for both users and machines since we’re using the same package format, but still avoid having to maintain another complex solution with databases if that could be avoided. Less things to maintain and patch. So full infrastructure was out of the question for us.
Today we can do both through the paid version of AppVentiX (formerly known as AppvScheduler), but we still install most our Global published programs through Altiris because we already automated all the scripts, commands and documentation needed for that scenario through our own tool, and we have a better possibilities too maintain pre. req. checks on our computers, and also inventory data.
We also created a little compiled PowerShell program that we use too deploy our App-V packages and CG's, it's checking the state of all active virtual processes on package publishing. It's giving our end users the option to save and close down active applications when needed. It's also giving us the option too auto close certain applications, and presenting it too end users with a friendly name in the message box from our own INI file.
We have now finished developing our own custom GUI version of Psappdeploy toolkit. Making use of all its functions will enable us to deploy pre. req. with App-V scripts during Add and Remove phase. But it will come with the cost of a larger start-up block making streaming slower.
On a pure Citrix/VDI solution AppVentiX is the “only” way to go IMO. Giving you lots and lots of tweaks for that scenario, and no need for any extra infrastructure.
Why we ended up creating our own tool?
Most of my readers would probably think that our journey was over by now, we had bought ourself several good 3rd party tools, and we could now : Change most package settings, and also sending scripts automatically into all our packages using Tweakappv.
The main reason was eliminating manual labour, that will both make you more efficient while avoiding human errors.
But to be honest, I am pretty lazy when it comes to doing routine jobs, and so are a lot of my co-workers. And that's actually a good thing if you have some spare time and programming skill set at your disposal, always try to automate as much as possible.
I tend to think I am pretty average when it comes to programming, but I think I have a pretty good eye for what could and should be automated due too years of experience, so when I see something is a good fit for automation I make up a small working script/program using google and my own ideas. Usually looking for CLIs and APIs to interact through.
During packaging that's often more than enough to make all the normal automations like I have explained here.
But if you are going to build bigger and better programs/scripts, you should be wise getting someone on-board having real programming skills.
Or you may use to much valuable time studying and doing trial and error before maybe getting the desired result.
I'm happy I have someone like that on my team, so for the last couple of years I have passed on my more complex request to him.
And that's how we ended up creating our own little tools: “HnAppvtool”.
At first it was supposed to be all about making automating scripting and documentation already having paid for AVE.
But we also wanted to change back GUID’s, versions and naming on the package so we didn't have to change previously command lines and scripts created with our own tool during testing.
But as time passed on we saw the potential for more automation.
Especial I wanted to see a log of all the major changes done from AVE and TMEDIT compared to the first package from the Sequencer tool.
So we integrated those programs into the tool, so all COM integration settings and file and registry changes would be written into our documentation file.
That comes in handy when you have to check up old packages without having to open them up.
Also, we would take new package revisions from other tools directly into the tools and finish all the job in there.
The end result we are working on today is made using pure PowerShell code and GUI.
UPDATE (20.05.21): We still use this program for first time installations, but if the program is being Sequenced more than one time we try use the AutoSequencer.
My programmer has rewriten this program from scratch using C# and Lib-V.
Mostly because of speed, but also because he thinks the codebase was not that great, he has learned a lot since the first version.
Our tool:
Should have done a video showing how we use the tool. But I don’t really like hearing my own voice trying to speak “Norwenglish” (English with Norwegian accent), so you have to settle for just some screenshot.
There may also come a time when we can release our complete codebase on Git like we have done before with other tools and concepts, but we need some internal discussions with my bosses about that first….
Also, some of the text is in Norwegian so we need to translate it all.
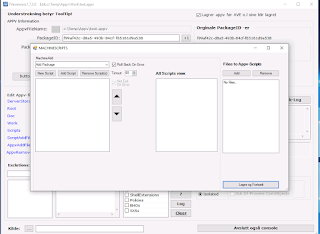
Main window:

In this window you can load your APP-V file, or your complete project using the “Kilde” button. It's translated to source in English.
“Kilde” file will contain all the files and versions used from your first App-V file was imported.
Loading App-V file:

As you can see here, all information about GUIDS and advanced package settings is on the first page. Giving you easy control over that part.
Also, there is a console view, showing the complete log of our program.
How to update all isolation settings:

Just check the wanted settings and then hit the Compile button.

After a while it will be finished, and the new settings will be updated in the GUI.

This box shows us what has happened during the compile phase.

And the new settings will be updated in the GUI.
How to work with AVE and TMEDIT:

If we want to work with AVE and TMEDIT, the following save settings has to be configured within those tools.
It will be available as a tooltip if you hit the button marked with yellow on the screenshot.
Then you just have to press the TmEdit and AVE buttons. And those tools will start up. Do your stuff there, save package, and close the tool.
Our tool will then ask if you want to accept the changes from those tools into the current project.

Accept changes buttons
“Ja”, is the same as Yes, and” Nei“ is the same as No.
You can always go back too before those edits if you have ticked the box “Lagrer app-v før AVE o.l. sine blir lagret.
Meaning “Save app-v before AVE and other edits gets saved”
“TmEditAutooUpdate” button:

This button will let you set and read all tooltips related too what can be changed using that tool.
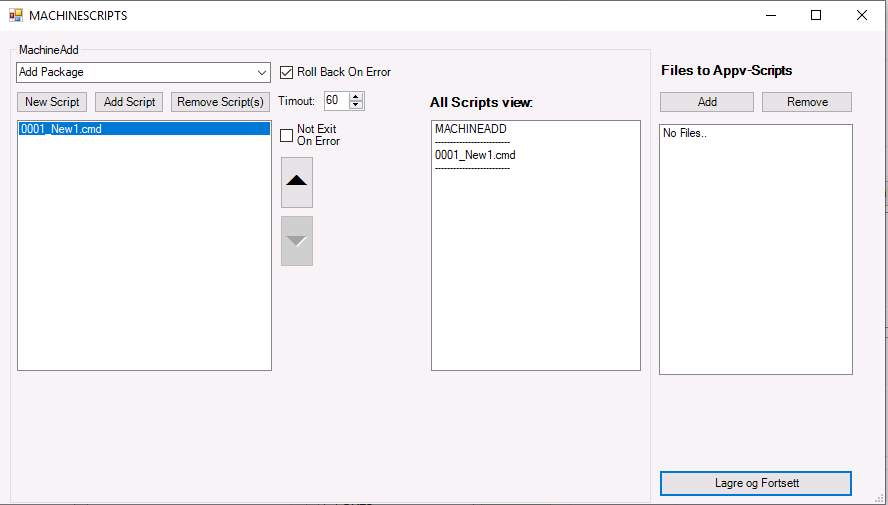
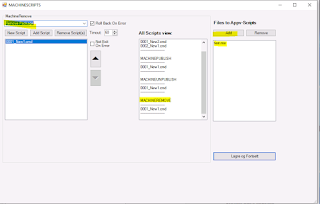
Machine Scripts:
Coming from SEV I missed having the possibility of creating several separate scripts per event, and how easy it was too change running behaviour by moving them up and down using arrows in the Composer.
So, we tried to mimic that behaviour as best as possible.
Adding script number 1 by pressing “New Script”.
The way we did it was making a simple but effective CMD script parser, so each subscript would be added into the main script. We are just using notepad as our paste editor. That is something we are going to change when we have the time. But for now, we make all our scripts in another editor and paste them over.

You can now see there is one script in the Machine Add main script.

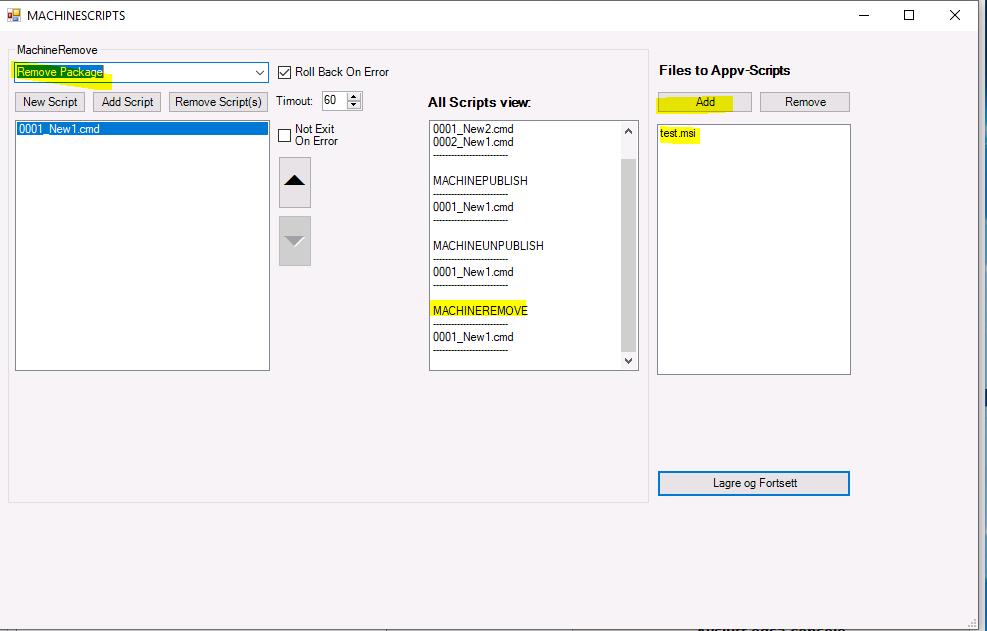
Here we have added another script

Here we have moved our 2nd script up, and it will be auto renamed “0001_” in the first part of the name, but the last part of the name will show us the original script name.
Since it’s based purely on CMD (batch) it will let you run PowerShell scripts, Vbscripts and everything else as long as the command lines are correct.

Adding files into script directory:
Using the buttons “Add” and “Remove” you can also add and remove script files into your App-V script folder.
You can also see I have created test scripts on all 4 Script events.
Then we just hit the button “Lagre og Fortsett”. Same as Save and continue in English J
One Easter egg is that you can edit and put scripts directly into the working event folder for the project on the disk, and it will be added during compile!

Scripts folder
This is how our finished CMD script will look when deployed on your machine.
|
@echo off
set hh=%time:~0,2%
if "%time:~0,1%"==" " set hh=0%hh:~1,1%
set dt=%date:/=.% %hh%%time:~2,6%
if not exist "C:\company\Appv\Scriptlog\" (mkdir "C:\company\Appv\Scriptlog\")
:Script_1
cd c:\temp
Dir
If not %ERRORLEVEL% == 0 (
Set ErrorKode=%ERRORLEVEL%
set Scriptnr=1
Set Info=AVSLUTTER!!!
Set Go=Ende
Goto ErrorHandler
)
rem ---------------------------------
:Script_2
mkdir "C:\temp"
If not %ERRORLEVEL% == 0 (
Set ErrorKode=%ERRORLEVEL%
set Scriptnr=2
Set Info=AVSLUTTER!!!
Set Go=Ende
Goto ErrorHandler
)
rem ---------------------------------
:Script_3
Rem --- AltirisMachineAddPackage Roule ---
reg add "hklm\software\wow6432node\company\Appv\test_123" /v AddPackage /t reg_sz /d 0.0.0.2/0759fa5e-74a1-4012-9f61-6babefff6cf3/4f1943d9-c43a-40b0-b411-cc0151c873f7 /f
If not %ERRORLEVEL% == 0 (
Set ErrorKode=%ERRORLEVEL%
set Scriptnr=3
Set Go=Ende
Goto ErrorHandler
)
rem ---------------------------------
Goto ende
:ErrorHandler
Echo %dt% >>"C:\company\Appv\Scriptlog\test_123.log"
Echo %Info% >>"C:\company\Appv\Scriptlog\test_123.log"
Echo PakkeID:0759fa5e-74a1-4012-9f61-6babefff6cf3 Versjonsid:4f1943d9-c43a-40b0-b411-cc0151c873f7 Versjon:0.0.0.2 >>"C:\company\Appv\Scriptlog\test_123.log"
Echo MachineAddPackage.cmd: Feiler i script nr %Scriptnr% Errorkode: %Errorkode% >>"C:\company\Appv\Scriptlog\test_123.log"
Goto %Go%
rem ---------------------------------
:Ende
|
As you can see, most of the stuff is logging, Altiris scripts and error handling.
The reason it wasn’t made in PowerShell is simple, we had a lot of different PowerShell versions back when this was developed, and it was also faster developing and deploying this.
Userscripts:
Almost the same as MachineScript, but with the extra options you only need for userscripts.
One complains we hear about is that there will be blinking CMD windows when userscripts is running. So, we need to wrap them into and exe or vbs too supress them. That’s is one thing for a future revision.

Userscripts screenshot
Registry viewer:
I found a great free registry tool some time ago and wrote a blogpost about it. We have been modifying it a lot too suit our purpose.
It will now fully understand all special App-V related registry keys, and is also modified too run as a command line tool during compile so it can write all changes into or Description file.
If there is more than 40 lines of reg changes it will only show how many changes we have done, and put a reference to the complete changelog file for you to see all changes.
You can also fire it up in the GUI mode from the tool if you want to view them directly. But big registry trees will often take some time to create.

Registry viewer screenshot
There are also two different buttons giving us different GUI views for folders and files in the tool.
But after we integrated AVE and TMEDIT into the program we haven’t updated and perfected this.
But it makes it possible to add, view and delete files and folders directly from the tool.
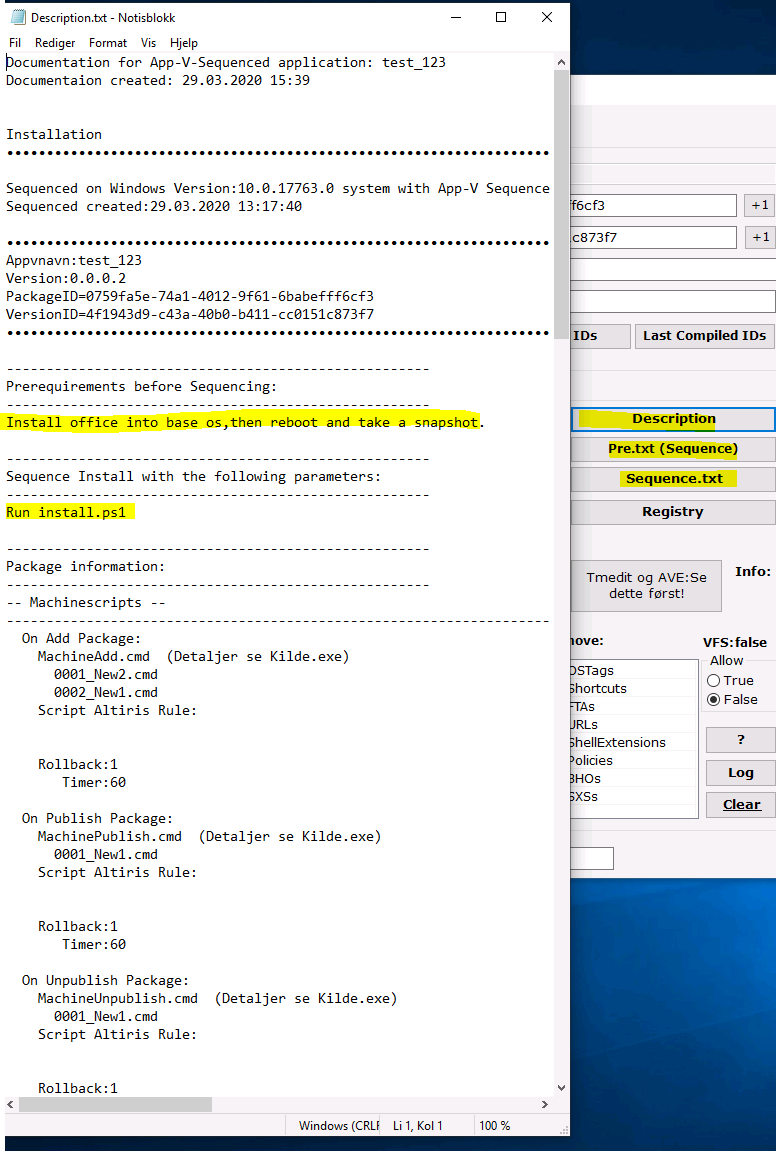
Documentation:
One of the most important parts of our tool is too create our documentation after we are done with the package.
That way you don’t miss up logging small last-minute changes… (who hasn’t done that? )
Our program has 3 buttons for Documentation, called “Description for the complete doc” and “Pre.txt” for the steps you do before Sequencing.
And the last button “Sequence.txt” for what you do during Sequencing.
It’s just txt files so you fill out everything and it will be created like this.

Screenshot of our documentation file
And the last part containing file and registry settings and COM settings:
Also, some Altiris stuff and all deployment PowerShell command lines, not on the screenshot.

Another screenshot of our documentation file
End credit:
This tool was developed in between other tasks over a period of 2 years, and most of my small team have been active in bug testing and the development of new functions.
Would not have been possible if we did not work together as a team!
Hope this blogpost will inspire someone else to create your own tools when there are no perfect alternatives out there.